Pieced Wadding Tutorial
Helen gave us a Wadding tutorial that didn't quite work out the way she wanted and so I told her how I join pieces of wadding left over from other quilts. So here it is for everyone.
Generally they are long thinner pieces that get cut off the side of the extra wide wadding I buy. But nothing goes to waste and I fold it up neatly (most of the time)and pop it in a 'green' shopping bag and store it on the shelf.
I lay out the quilt on the floor and drap pieces of wadding over the quilt top til I can't see it any more. Like a jigsaw puzzle. I then work out which piece needs to be sewn to where and in what order.
This particular quilt will need 3 pieces of wadding to cover it.
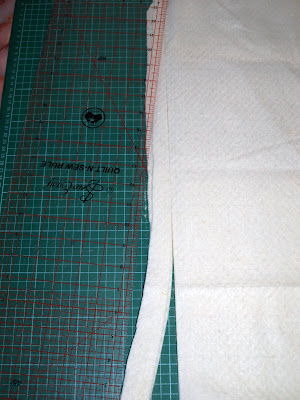
I trim and even the edges of the wadding by using the rotary cutter and quilting ruler.
Then I lay them over the iorning board so that the pieces butt up against each other but don't overlap at all. I find the ironing board a good hight for this and the wadding grips slightly to the ironing board cover and they don't fall on the floor.
Then I use a long sharp needle and cotton thread to hand stitch the two edges together. The stitch is called a 'Herringbone Stitch'.... I think....?? Basically it is just a big zig-zag stitch that crosses back on itself...if that makes any sense at all...lol...understandable instuctions can be found here

My stitches are not small and even and they get worse as I go along, but you won't see them and they don't really have to last long....only while you sandwich the quilt really. I find it a super quick stitch to do over a long area and it only takes a few minutes to join the pieces to together. You just have to be careful that you don't catch the ironing board cover in the stitch as well!
When I've got all the pieces together is it ready to be used in the quilt. I lay the stiches facing down towards the backing as this fabric is generally darker and this thread colour may show through a white fabric.
I've never had a problem quilting a pieced wadding nor can I even tell which quilts have wadding jigsaws and which don't!
Good Luck!
Generally they are long thinner pieces that get cut off the side of the extra wide wadding I buy. But nothing goes to waste and I fold it up neatly (most of the time)and pop it in a 'green' shopping bag and store it on the shelf.
I lay out the quilt on the floor and drap pieces of wadding over the quilt top til I can't see it any more. Like a jigsaw puzzle. I then work out which piece needs to be sewn to where and in what order.
This particular quilt will need 3 pieces of wadding to cover it.
I trim and even the edges of the wadding by using the rotary cutter and quilting ruler.

Then I lay them over the iorning board so that the pieces butt up against each other but don't overlap at all. I find the ironing board a good hight for this and the wadding grips slightly to the ironing board cover and they don't fall on the floor.

Then I use a long sharp needle and cotton thread to hand stitch the two edges together. The stitch is called a 'Herringbone Stitch'.... I think....?? Basically it is just a big zig-zag stitch that crosses back on itself...if that makes any sense at all...lol...understandable instuctions can be found here

My stitches are not small and even and they get worse as I go along, but you won't see them and they don't really have to last long....only while you sandwich the quilt really. I find it a super quick stitch to do over a long area and it only takes a few minutes to join the pieces to together. You just have to be careful that you don't catch the ironing board cover in the stitch as well!

When I've got all the pieces together is it ready to be used in the quilt. I lay the stiches facing down towards the backing as this fabric is generally darker and this thread colour may show through a white fabric.

I've never had a problem quilting a pieced wadding nor can I even tell which quilts have wadding jigsaws and which don't!
Good Luck!


Comments