{Makers Tote} Sew-a-long
Noodlehead has lots of fabulous bag patterns with one of my favourite being the 241 Tote which I've made a few times.
One of her newest bags is the Makers Tote. This pattern was released at the end of November 2015 and I knew it would be perfect for my cross stitch.
I've been keeping my cross stitch in a 'green' shopping bag, that after being carted back and forwards a bit it was looking alittle lot worse for wear. Actually is was so badly torn it couldn't carry anything any more so I was getting kinda desperate.
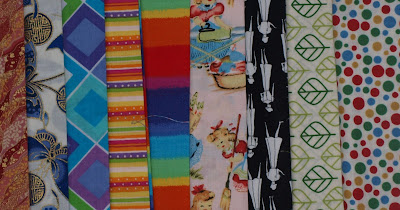
So with the holidays approaching and know I would have some sewing time up my sleeve, I looked for some fabric to use and of course got some feedback off my lovely sewing friends.
The lovely Rachel from Barefoot crafter is sewing along with me and she has chosen some lovely fabric too! I can't wait to see hers finished!
There are 2 sizes in the pattern and I made the bigger one.
Here are some progress shots
The outside pocket on which I used my new/old snap press for the very first time. I assume the novelty will wear off but this first time was fun. I've already been thinking about what other patterns need snaps so I can sew them too!

 I had a little trouble with the zip size. I had a 10" like the pattern said but as you see from this pic the zip was a little short. It only measured 9.5 from metal to metal. Luckily I had a bigger zip in my stash, just a different colour that I was able to use instead. I still have a few adjustments to make next time to get it to sit absolutely perfectly.... like use the iron when it said to! But I'm really happy with how this pocket turned out too.


The outside feather fabric I bought to make this bag, but the rest of the fabric came from my stash. As I was using what I had on hand I changed around some of the fabric placements to fit with what I had. The handles were supposed to by the same as the binding, but I didn't quite have enough.
The internal slip pocket I made using a 2013 fundraising tea towel from my son's Kindy. You buy these things to help out the Kindy and then it sits around for a while and gets moved from place to place. I had no intention of using it as a tea towel as I didn't want the cute drawings to fade. This way I can have his drawing for ever! It is a lovely thick linen and is perfect for this pocket!

It fits my 3 current cross stitch projects with lots of room to spare.


One of her newest bags is the Makers Tote. This pattern was released at the end of November 2015 and I knew it would be perfect for my cross stitch.
I've been keeping my cross stitch in a 'green' shopping bag, that after being carted back and forwards a bit it was looking a
So with the holidays approaching and know I would have some sewing time up my sleeve, I looked for some fabric to use and of course got some feedback off my lovely sewing friends.
The lovely Rachel from Barefoot crafter is sewing along with me and she has chosen some lovely fabric too! I can't wait to see hers finished!
There are 2 sizes in the pattern and I made the bigger one.
Here are some progress shots
The outside pocket on which I used my new/old snap press for the very first time. I assume the novelty will wear off but this first time was fun. I've already been thinking about what other patterns need snaps so I can sew them too!

I usually skip the extra pockets especially if they need a zip. But this time I decided to try an internal hanging pocket.


Just a word of warning if you decide to make this bag...the binding that finishes the bag all the way around the outside...has to be hand stitched down! I don't mind hand stitching quilt binding and this is almost exactly the same...just got to get around those curves!
I didn't use the 'foam' interfacing as the pattern suggested. I couldn't find any in a hurry and didn't want to wait. The bag stands up Ok with out it and next time I'll add some quilting to help it a little bit more. I'll keep looking for some to try although I'd expect those tricky corners to get a whole lot more ticker!
The pattern shows you how to make the bias binding but if you want a method that uses a whole lot less fabric try this one on the Melly Sews blog.

The internal slip pocket I made using a 2013 fundraising tea towel from my son's Kindy. You buy these things to help out the Kindy and then it sits around for a while and gets moved from place to place. I had no intention of using it as a tea towel as I didn't want the cute drawings to fade. This way I can have his drawing for ever! It is a lovely thick linen and is perfect for this pocket!

It fits my 3 current cross stitch projects with lots of room to spare.


Comments